Tuesday, August 16, 2005

Lightguns have arrived !


Hais Mission Light Gun


My god ! Isn't the internet amazing ? I ordered two of these yesterday afternoon from :

http://www.divineo.co.uk/cgi-bin/div-uk/us-ps2-mlg

And they were waiting for me at work this morning !

I am now a convert to the British Postal Service !

Of course, I don't have a PS2 so they will sit in their boxes till my bro has built that circuit. I bug him every day about it but I don't think he will start it until I stop going on about it :)

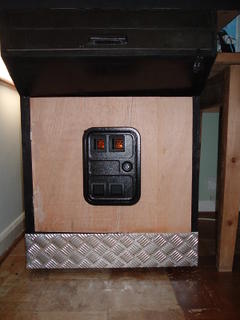
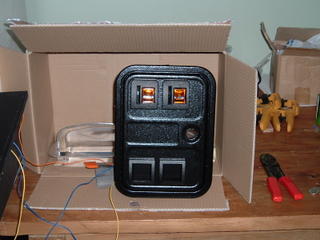
Coin Door Lights !

Bribed my brother to come over and solder some wires to the coin door lights. Its amazing what two pints of beer can do !

We used the tutorial as described here -

http://www.retroblast.com/articles/coindoor.html

Worked exactly as they said. Theres even a video to watch how they did it !

My brother (Howard) said last night that I'd never mentioned him - I have now ! He also wired up the VGA-SCART cable which basically turns your TV into an arcade monitor. The picture quality is superb - theres no "bleeding" of colours. One example is the edge of the maze in Pengo. Before I was using a TV-OUT socket on my Nvidia card going into a SCART adaptor. The maze edges were very blurry and the shape was all stretched. With this new cable (and an ATI card) the maze edge is perfect.

His next job is to make another VGA-SCART Cable but with an extra cable coming off it attached to some circuit with an RF socket attached. This is for the lightguns I mentioned in a n earlier post.

Sunday, August 14, 2005

Coin door wiring fixed & Lightguns

Forgot to mention that Balki fixed the wiring problem on the coin door where the "old" coin buttons had stopped working. Turned out I'd wired up the coin doors wrongly ! Althought they seemed to work they actually didn't - they were set to register credits unless a coin was inserted . Weird huh ?

Looking into wiring up a couple of PS2 guncon2 guns for House of The Dead 1/2/3 and others. Need to wait for my brother to solder some circuitry which may take a couple of weeks. More details can be found here :

http://xoomer.virgilio.it/smogdragon/

http://guncon.acornscity.com/

I may go for the second driver as there seems to be more updates on that one.

Coin Door in place


Got some time this weekend to cut the hole for the coin door. Also fitted the two locks - one for the coin door and one for the cab door. Need to find a way of switching the PC on without having to unlock and open the cab door. Might have a look at wiring up an external switch.......

Cab door needs another coat of paint and the entire cab needs re-painting/sanding etc.

Friday, August 12, 2005

Tournament Nite 4

Last night was Tournament Nite (again). Good choice of games with a nice mixture. Victory was sweet as I've lost the last 2 tourneys pretty convincingley so to win with such a large margin was good. I will post the actual scores in an update at some point but really this is just a practice post to see if I can post tables !

Rules of the tourney are : Each player picks 2 games. Each game is then played in a best of 3. In case of a draw then a final game is selected and played either in a best of 3 or a one off game (depending on time).

Heres the results showing that Buks (6) beat Balki (2) to take the trophy home !


PL1

Buks

PL2

Balki

Super Hang-On

0

0


1

1


Penguin Brothers

1

1


0

0


Moon Patrol

1

1


0

0


Salamander

1

1


0

0


Wednesday, August 10, 2005

Coin Door Arrives !


I ordered a 2 player mini coin door from Suzo a couple of weeks ago. They have a minimum order of £100 which is a bit steep for a hobbyist but I suppose they don't want to waste time with people ordering £1.25 barrel locks. My order came in at less than £100 anyway and the bloke on the phone was ace.

Also bought a "redemption tray" to store 10p's in - its a fair bit bigger than I'd expected so not sure where to put it yet.

Wired up the door to test it and it works ! Minor problem is that the buttons that used to be Coin 1 and 2 don't work anymore. Not a problem as they will be used for Pause and Escape on my new CP when I get round to making it.

Saturday, August 06, 2005

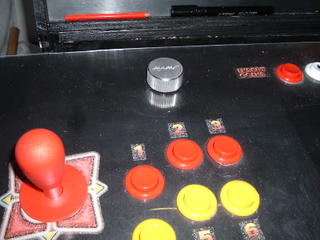
Added a spinner


Excellent spinner from Oscar Controls. I'm rubbish at Arkanoid though so I tend to use it for driving games (not perfect but better than the sticks !). I smashed the perspex overlay while drilling the extra holes for this but it was cracked anyway. Also that gave me the push to create a smaller replacement CP.

I've since added two orange buttons for left/right mouse which go next to the spinner.

Marquee !


the marquee is hand painted (in reverse on the back). I'm no artist and it's not brilliant but looks okay from a distance. With the marquee light on you can see all the imperfections and that I used the wrong paint. Not bad though and good enough for now.

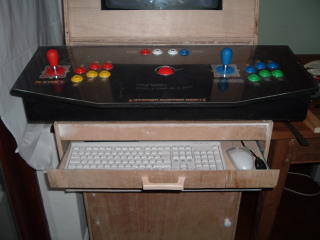
also included a new piccy of the keyboard drawer with mini-keyboard.

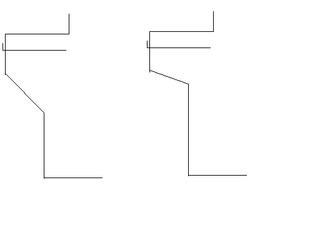
Decided to alter the profile

Before


After

I wasn't happy with the profile shape of the cab plus the bar stool I bought could only be raised so far before your knees banged into the underside of the cab. After much though I finally decided to use my jig-saw and luckily didn't wreck the whole thing. I'm much happier now with the look as well as there being more room for your legs.

the "after" picture is a bit dark so heres the original sketch comparing the before/after shapes:

Time for a mini-tournament


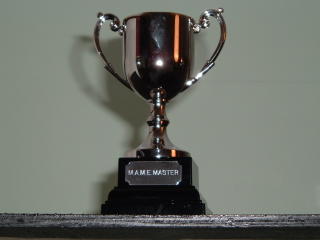
The "trophy"

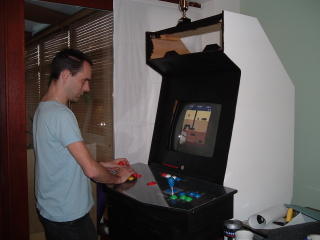
Balki on Dig-Dug


Buks on Pengo

Played a couple of tournaments with my good friend Balki. We are still trying to decide on the best method for scoring but so far I have won the trophy once, and Balki has regained it and kept it for the last 2 tournaments. We choose 2 or 3 games each and play 3 rounds on each game. The first tourney lasted about 3 hours and was a draw so we had to play a single game highest score wins. Since then we have played less games but its been good fun (despite losing the last two times).

Piccies here of the trophy and me and Balki in action.

Painted


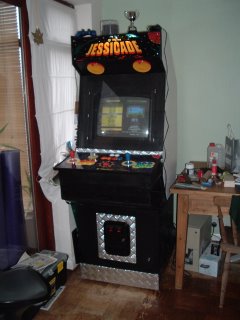
Heres a couple of pics of the cab with its new paint-job.

Speakrs and slidy keyboard drawer


Okay time for a speaker piccy - theres two mini speakers below the marquee area with a subwoofer in the base of the cab. Theres also a volume control "thing" that sits in the ketboard drawer (but keeps sliding down the back) but this will be mounted "somewhere" eventually.

Heres a piccy of the keyboard drawer too. Since then I've bought a mini-keyboard (£14.99 from Maplins) thats really cool and leaves a load more room for mouse movement.

Worth pointing out here is that the TV is connected to an Nvidia card via S-Video. Can't remember the make/model of the card as I've since switched to Ati.

Overall shape coming together


I did have some photos of the lower half on its own but I appear to have lost them. They were crappy quality anyway as they were taken with my pre-war mobile phone (Boer War :) ).

The design was originally strictly Lucid Arcade Flashback but after seeing the Ultimate Arcade II cabs (http://www.mameroom.com) I decided to modify the Lucid design and make a hybrid cab of my own. It actually looks just like a UAII but thats what I wanted anyway.

Hopefully heres another piccy with the TV in place (thats if you can post more than 1 pic per post !). EDIT : Looks like they appear in the wrong order but I think people will follow what I'm saying.

Added a trackball


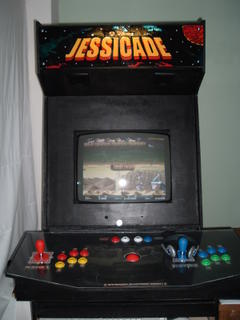
The title on the CP is "Arcadian system 2004" which was always a working title. This has since changed to "Jessicade" as its named after my daughter who was born during its contruction !

Worth mentioning here that the CP controls are all from the excellent Ultimarc (highly recommended by the way).

The CP in this picture currently had :

IPAC 2
2 T-Stick plus joysticks
6 buttons per player
PL1 / PL2 and two coin buttons
OPTIPAC
Trackball and mounting plate

The wiring is a mess as this is the first time I've ever done anything remotely electronic - aprt from wiring a plug !

Note the crack in the perspex which ruins the overall effect for me but most people don't notice it or if they do its all part of the "old and battered arcade machine" look-and-feel.

Back to the start


Okay, I've taken a few photos during the construction of my arcade cab but not of every stage. This one is of the Control Panel which was the first bit to be contructed - note that theres a gap in the middle which is for the trackball (couldn't afford the parts all at once). Work stopped after this as I spent about 6 months playing MAME games on a spare monitor positioned on the end of the dining table. Good fun though :)

Changes made after advice


After a few people posted comments on the BYOAC Artwork forum I made the suggested changes. The sun in the top right has now shrunk somewhat and now hopefully doesn't distract the viewer. I have also completely re-done the joystick and button surrounds using circles rather than joined up curves. The difference may not be too apparent in the jpeg images but it is noticable in the original Illustrator image. Thanks to all who commented on BYOAC.

Thursday, August 04, 2005

First piccy up !


This is going to be out of date order as I'm at work and all the photos are on the home machine. But I'm too impatient to wait till I get some time at home to post so heres the latest mini project - designing a new Control Panel Overlay (CPO). The existing CP is pretty basic and originally had a perspex cover. This shattered when I added the holes for the spinner and two mouse buttons. It was one of those times when I was rushing the job and didn't bother to take the necessary precautions - clamping the sheet down and drilling through a sandwhich of wood and perspex. After a few weeks without the perspex cover I decided to design a proper CPO which would be printed and laminated. After much searching and sketching I finally came up with a design loosly based on the Defender theme that the marquee is based on. One quick lesson in Adobe Illustrator later and I came up with the piccy posted here (Note this is a jpeg export of the .ai file which is much more detailed) . Not bad for one weeks work using software I'd never seen never mind used before !

First posting !

Well, this is it. I've finally decided to publish photos and info on my home built arcade machine.

It's been build over a period of 2 years and is still not finished - and by the accounts of fellow arcade machine builders - it never will be finished !

The aim of this blog will be to document the project and will also be somewhere for me to store all the photos I have taken !